Average Reviews:

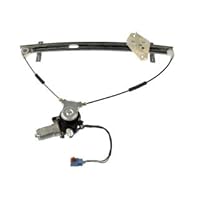
(More customer reviews)My wife's 2002 Honda CRV driver side front power window winder decided to break last week while we were out running errands. Turns out the window regulator cable that controls the "up" function decided to snap in half. I spent a few hours poking around the various Honda enthusiast forums on the net to see what the dealers charged to fix this and also to see how hard this was to install as a DIY project. It seems that the Honda dealers want anywhere from $500-700 to replace this part (it's $301.43 for just the regulator assembly alone from Honda). There was no way I could justify dropping that kind of money on what looked like a pretty simple install so I decided to tackle this myself. The Dorman part sells for upwards of $200 (NAPA) and as low as $30 online from places I've never heard of before. I decided to forgo the places that sold them on the super cheap as their online satisfaction ratings and customer reviews were quite dismal. The Dorman item is nicely made and included the plastic clips to hold the wiring loom into place on the door. The unit had a nice heft to it and didn't feel like some made in China for $2 piece of junk (it's made in Taiwan, BTW). Everything bolted right up and used the factory mount points but for some odd reason the replacement motor assembly is bolted into the door differently than the original Honda part. The Honda part is held in place by 3 bolts that go through the door and into threaded mounts in the motor chassis. The Dorman part is the opposite -- it has it's own threaded bolts mounted to the motor chassis and it now gets secured to the door panel with nuts. This is fine except that they didn't include any nuts! (this was the reason why I took a star away on my rating). Luckily I had some nuts that fit in my spare parts bin. Installation was pretty straight forward -- I had the job completed start to finish in 45 minutes and I've never done one of these before. All you need is a phillips screwdriver, a flat tip screwdriver and a 10mm socket. I wasn't able to find any online installation "how to" procedures or videos for the 2nd Gen CRVs (there's a ton of doc for the 1st gen CRV's though), but in all honesty the hardest thing to figure out was how to remove the little round plastic clip under the mirror cover plate on the inside top of the door card. I started by pulling the triangular panel off behind the mirror -- this is just held in with 2 clips -- pull the top towards you -- it should release the top clip and then use a flat tip screw driver to help free the bottom clip. There is a small panel behind the door handle on the inside -- a flat tip screw driver put into the small notch in the top of the little cover panel will allow you to pop it off -- there are 2 screws behind this panel. Remove the screws and the door handle/power door lock panel will be free from the door card -- almost. You will have to disconnect the wiring harness plug for the power door locks and then there is a metal rod that mounts to the door handle -- use your flat tip screwdriver to move the plastic tab that holds the rod in place away and the metal rod will separate from the handle assembly. Put the handle assembly off to the side. Next, there are 2 screws located under the door pull -- one on the left and one on the right -- remove these. Along the top of the door under where the mirror is located is a round plastic clip -- use your flat tip screwdriver to help to remove this clip. The door card should now be able to be pulled away from the door -- there are plastic clips all along the perimeter of the door card -- just give it a firm tug and the door card should dislodge from the door. If the window is still functional using the power up/down button, adjust it so that you can see the screws that hold the window to the regulator through the access holes -- you will need to remove these shortly and it's best to adjust the window position now before you disconnect the buttons. Disconnect the wiring plugs for the window buttons, mirror adjustment and tail gate window release buttons -- the door card should be free of the door now -- set it aside. The plastic vapor barrier can either be pulled aside and held away from your work area with tape or you can just carefully remove it and set it aside which is what I did There is a clip along the top edge of the speaker -- use your flat tip screwdriver to free the clip from the door and pull the speaker out -- remove the wiring plug to the speaker and set the speaker aside. There are a total of seven 10mm bolts that hold the regulator and motor in place and two 10mm bolts that hold the window into the regulator. Take a good look at how your old regulator is mounted and make mental notes on how the new one needs to be positioned. Remove the two bolts that hold the window to the regulator and carefully pull the glass out through the top of the door -- tilting it at an angle seems to help in getting out of the door opening -- set it aside in a safe place where it won't get broken. Next remove the four 10mm bolts -- two on top and two on the bottom that hold the regulator track in place. Disconnect the wiring connection for the window motor and pull the two plastic mounting clips out of the door that holds the wiring in place for the motor -- there is one on the front and another on the rear of the door panel. There are three 10mm bolts that hold the motor in place -- take these out and the whole regulator assembly can then be pulled out of the door using the largest access hole on the middle/left side of the door. Installation is the reverse of what you just did. Dorman did not include the nuts to hold the motor assembly in place with my order -- I am not sure if this is normal or not -- double check the contents of your package before you start the installation and source the nuts if needed before you start. All in all this was a pretty simple installation and was definitely worth my while to do the work myself. I just hope that we get 9 years out of this one as we did with the OEM part.:)
Click Here to see more reviews about: Dorman 741-302 Honda CRV Front Driver Side Power Window Regulator with Motor
Dorman Products Inc. is a leading supplier of Dealer "Exclusive" automotive replacement parts, automotive hardware and brake products to the Automotive Aftermarket. These products are often re-engineered with improvements for better reliability compared to the original part. Additional components needed for a complete repair are typically included as kits with Dorman parts. Dorman also helps reduce repair cost by providing the option to replace just the failed piece, not the assembly. Dorman takes pride in the quality of their products and in your satisfaction.
 Get 77% OFF
0 comments:
Post a Comment